In this tutorial we’ll build a fun little real-time control voltage recording device in order to reinforce some of the basic V/Bar concepts we’ve been looking at and to further explore the functionality of the CV Sequencer module.
It’s important to realise that this is a demonstration patch. The end result is not intended to be a serious production tool. But it will hopefully give you a few ideas for creating your own more practical patches.
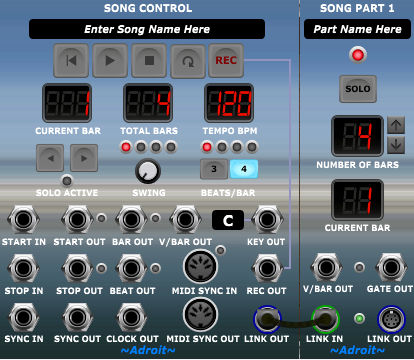
Start a new patch and add a Song Control module and a Song Part module and link them together to form a minimal Song Control Sequencer as before.
Use the little down arrow button on the Song Part module to reduce the NUMBER OF BARS to 4. Notice that the Song Control module picks this up through behind the panel communication and adjusts its TOTAL BARS number to 4 too.
When multiple Song Part modules are chained (as we will see later in the tutorials) each of their NUMBERS OF BARS are summed so that the TOTAL BARS displayed is the number of bars in the entire song.
Add a Time Split 4 module to the cabinet below and patch the V/BAR OUT socket of the Song Part module to the V/BAR IN socket of the Time Split 4 module.

Click on the Song Control PLAY button and you’ll notice that the Time Split 4 LEDs light up in sequence. Time Split 4 works in the same way as Time Split 2 but over four bars instead of two.
Now add a CV Sequencer to the right of the Time Split 4 module. We are going to use four CV Sequencers linked together to form a 64 step sequencer but to save a bit of time we can set the first up and then use Voltage Modular’s Duplicate function to save us having to do some operations repeatedly.
Also to prevent cable clutter we’ll use the Voltage Modular bus facility to make some connections.
We are going to use the upper channel of the CV Sequencers to record pitch information and the lower channel to record gate information.
At the top of the window right click on the PITCH socket and select Assign to Mono Bus and then the Add New Bus… option.

This makes the PITCH signal available on bus 1…
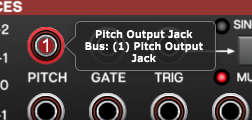
Now right click on the upper REC IN socket of the CV Sequencer.

Select Assign to Mono Bus and 1 (Pitch Output Jack) and then the PITCH will be fed to the REC IN socket via Bus 1.
Now use the same mechanism to connect the GATE socket at the top of the window to the lower REC IN socket of the CV Sequencer via Bus 2.


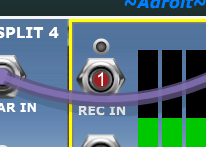
Use the same mechanism yet again to connect the REC OUT socket of Song Control to the REC ARM IN socket of the CV Sequencer via Bus 3.


Click on the lower COLOR button to change the color used by the lower channel of the CV Sequencer to cyan – just to make it obvious that the upper and lower channels are controlling different things.
Now we can use the Duplicate option to take advantage of these settings and save a little time.
Right click on a blank part of the CV Sequencer and select Duplicate from the menu.

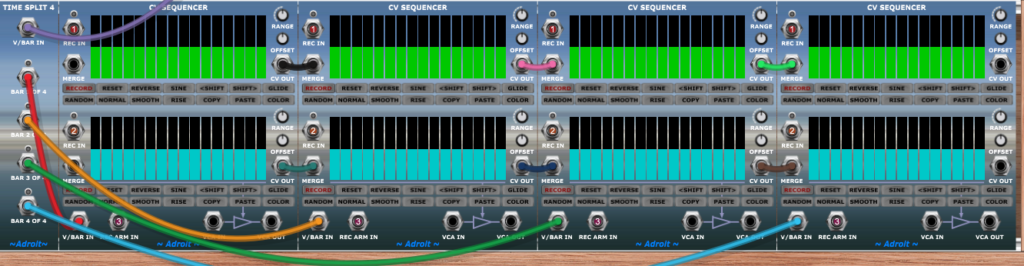
Do this three times in total and you will end up with a row of four CV Sequencers all with the REC IN and REC ARM IN sockets already connected to the three busses and all with the modified color scheme.

Next link all the CV Sequencers together by connecting the upper and lower CV OUT sockets to the nearby MERGE sockets. (Six cables are used).
And connect the four outputs of the Time Split 4 module in order to the CV Sequencers’ V/BAR IN sockets.
This is essentially just like we wired up the Time Split 2 module to two CV Sequencers in Tutorial 2, but this time with four CV Sequencers instead of two.
That’s the real-time CV recorder finished!
Next we’ll build a little synthesizer instrument for it to drive. But first hit PLAY on the Song Control Sequencer to test things. You should see the now familiar highlight work it’s way all the way from the first step of the first CV Sequencer module to the last step of the final one.
If it doesn’t work then retrace each step of this tutorial so far and check your wiring.
You’ve invested quite a lot of effort in this patch already, so save it as a preset called Tutorial 3 at this point. You can then at least get back to this point if something goes wrong – like your computer losing power.
Right, let’s build a bog-standard monophonic subtractive synthesizer voice in the gap we have in the top right of the patch using just modules from the Nucleus bundle.
Add an Oscillator, Filter, Envelope Generator, Amplifier another Envelope Generator and a Spring Reverb.
Patch them together as shown in the image below. It’s beyond the scope of this tutorial to explain this but it’s a completely standard setup that most of you will be familiar with. It’s a rather dull patch but will serve well enough as a demonstration instrument.

If you click on the GATE button of the right-hand Envelope Generator it should emit a rather unpleasant buzzing sound. This can be greatly improved upon by tweaking the settings, so don’t worry.
Next we need to connect the sequencer to the synthesizer using a cable patched from the final, rightmost, CV Sequencer’s upper CV OUT to the Oscillator’s PITCH CV input. This enables the upper sequencer channel to control pitch.
Then patch cables from the final, rightmost, CV Sequencer’s lower CV OUT to both of the Envelope Generators’ GATE IN sockets. This enables the lower sequencer channel to send gate signals to both the filter and amplitude envelope generators.

We should now have a working patch, If you have a MIDI keyboard attached then you will already know how to use it to drive the PITCH and GATE sockets.
If you don’t have a MIDI keyboard or are new to all this then you can tinker with the built-in virtual keyboard provided in Voltage Modular which you can launch by clicking on the little keyboard icon at the top of the window…

This will pop-up a little keyboard that you can play using the mouse or the computer’s keyboard as labelled in the graphic. It’s nothing fancy but will enable you to test things even if you don’t have a MIDI keyboard or a DAW acting as a host.

Next, to “arm for recording” click on the Song Control Sequencer’s REC button.

You should then see all the CV Sequencer’s RECORD buttons light up indicating that they are all armed to record.
Now click the PLAY button…

…and tinkle away on your MIDI keyboard or randomly stab at the little virtual keyboard to enter some notes.
You should end up hearing some rather nasty tune reflecting your input and the sequencer display should show you what was recorded. It should look something like the following…

The green upper display shows the pitches recorded and the lower cyan display shows the gate signal recorded.
It may take a couple of attempts before you get something like this. And it will sound pretty awful because of the initial settings of the synthesizer modules.
Now let’s make the recording replay in a loop so that we can adjust those synthesizer modules to something a bit less painful on the ears.
Engage LOOP and then hit the PLAY button again.

If you are already familiar with Voltage Modular then you will quickly be able to dial in a half decent sound with the modules we’ve patched up as a mini-synth test bed. Or simply replace the test bed with something of your own.
If not then begin by turning down the Filter CUTOFF to soften the sound. Then turn up the Filter FREQ MOD 1 knob so that the first Envelope Generator modulates the filter cutoff frequency to add a bit of life, adjusting the filter CUTOFF knob further to find a sweet spot..
Play with the various ADSR sliders until you have something that sounds interesting. Reduce the reverb MIX knob setting to get a drier sound – where the reverb is only just audible.
Save the finished patch (as Tutorial 3).

Obviously, this is a fairly crude demonstration patch rather than a serious production tool but you should still be able to get some interesting results after a little bit of practice.
To re-record. Click on STOP, REC and then PLAY.
One way to obtain better results is to set the tempo quite slow when recording and then speed it up when playing back.
In the next tutorial we’ll make some modifications to improve this patch and introduce a few more LSSP features.