So, here we go…
Run Voltage Modular and click the NEW button in the top left corner to begin with a new empty patch.

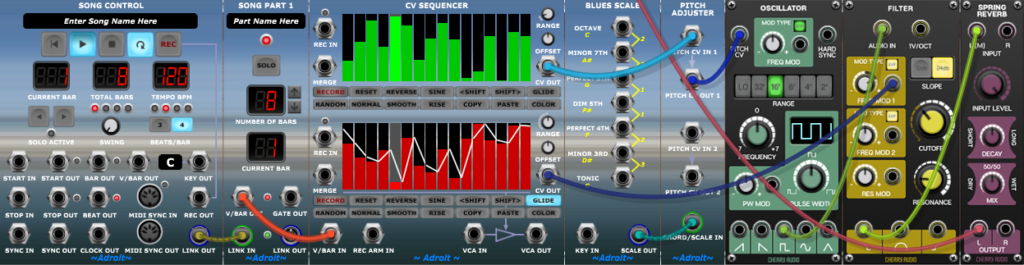
Use the Library or the Add Module… option in the right button menu to add a Song Control module.
Add a Song Part module using the same mechanism.
Patch a cable from Song Control’s LINK OUT socket to the Song Part’s LINK IN socket.
You now have a very basic Song Control Sequencer…

Click on the PLAY button.

Marvel at the pretty flashing lights until it stops after a short while.
What’s going on here is that Voltage Modular’s SYNC OUT signal is being connected to Song Control’s SYNC IN socket behind the scenes and when you click PLAY the Song Control Sequencer plays for 8 bars and then stops.
Click on the LOOP button

It will light up in blue.

All Adroit toggle switches light up this way when active. In the documentation this active state is referred to as “engaged”.
Click PLAY again. This time the Song Control Sequencer will loop continuously.
Add a CV Sequencer module and patch the Song Part module’s V/BAR OUT socket to the CV Sequencer’s V/BAR IN socket.

CV Sequencer has two channels referred to as upper and lower or A and B.
Notice the highlight on the CV Sequencer moving from left to right. This highlight shows the currently active step in the sequence.
The sequence lasts for one bar (measure) and has 16 steps.
Add an Oscillator module and patch the CV Sequencer module’s upper CV OUT socket to the PITCH IN socket of the Oscillator.

Then patch the Oscillator’s Square Wave socket to the 1L (M) MAIN OUTS socket at the top of the screen. WARNING you will hear an awful deafening noise so turn down the volume to almost nothing first!
Note 1L (M) refers to the 1st Left channel and this works as a Mono input if the right channel isn’t used.

Locate the upper RANDOM button on the CV Sequencer and click on it.

You should now hear something like R2D2 having a really bad day.

It sounds truly awful so unplug the cable connecting the Oscillator to the 1L (M) MAIN OUTS socket for some welcome silence and let’s work on making this super primitive patch slightly more interesting.
Creating a sophisticated sounding patch is beyond the scope of this first tutorial so we will just be adding a few elements to make things a little more controlled and musical. The modules used are limited to those included in LSSP 101 and the free Nucleus bundle of Voltage Modular so you can explore everything here at no cost for the duration of the free demo.
Add a Filter module and a Spring Reverb module and patch the Square Wave output of the Oscillator to the AUDIO IN socket of the Filter and the Low Pass output of the Filter (the socket in the bottom left hand corner of the filter module) to the L (M) input of the Spring Reverb.
Finally patch the L OUTPUT of the Spring Reverb to the 1L (M) MAIN OUTS socket and turn down the Filter’s CUTOFF knob until the sound is only just audible.

You should now have R2D2 sounding a little mellower and far far away.
Let’s now use the second channel of the CV Sequencer to modulate the Filter’s cutoff frequency.
Patch the lower CV OUT socket of the CV Sequencer to the FREQ MOD 1 input on the filter.

Locate and click on the lower RANDOM button on the CV Sequencer.

Now turn up the Filter’s FREQ MOD 1 knob until R2D2 comes alive with each beep sounding rather different in character.

Engage the lower GLIDE button on the CV Sequencer to replace R2D2 with something a bit more like a muted trombone sound and click the COLOR button beneath the GLIDE button a couple of times to jazz up the color scheme a little…

The white line shows the effect of the glide. Smooth out the effect even more by pressing the lower SMOOTH button once or twice and tweak the Filter’s CUTOFF and RESONANCE knobs a little to find a sweet spot.

Hopefully you’ve got something a little more interesting going on now, but it still sounds “out of tune”. So let’s insert a Pitch Adjuster module between the CV Sequencer and the Oscillator.

This adjusts the voltage coming out of the CV Sequencer so that it fits in to the chromatic scale – so it already sounds a bit more musical. But there are some odd intervals in there so it still doesn’t sound right. So let’s restrict things to a smaller choice of notes by adding a Blues Scale module and feeding its S-Poly scale signal into the Pitch Adjuster’s CHORD / SCALE IN socket.

Now we are cooking. There are fewer intervals and it sounds increasingly musical, But there’s still much too much jumping up and down in pitch so let’s restrict the range to something more in keeping with the range of a human voice.
The upper channel of the CV Sequencer is controlling the pitch so locate its RANGE knob and turn it down to a value somewhere below 2. This limits the pitch range to under 2 octaves.

You should now have a crude one bar riff that sounds almost half decent!
Try tweaking the various controls and use the random buttons to try out new sequencing material. If you go too far astray you can use the UNDO button at the top of the screen to retrieve previous settings.

Save the patch as a preset called Tutorial 1 so that you can reload it later.
That’s Tutorial 1 done. I hope you now have some insight into the basic operation of the Song Control Sequencer, CV Sequencer, Pitch Adjuster and the Blues Scale.