Table of Contents
Basic operation
Click here for an introduction to and reference material for the Melody Sequencer.
In order to function, a Melody Sequencer module must be linked to at least one Rhythm Sequencer module. And in turn, to function correctly a Rhythm Sequencer needs to be fed a V/Bar signal.
So a Melody Sequencer requires a certain minimum supporting environment before it will do anything at all. A good place to start is with the patch shown below.
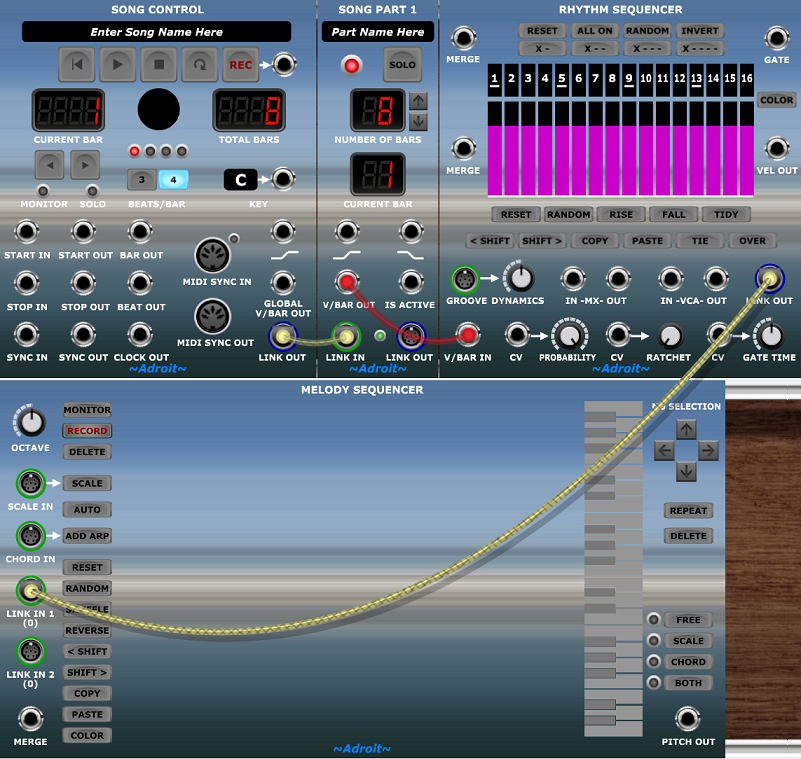
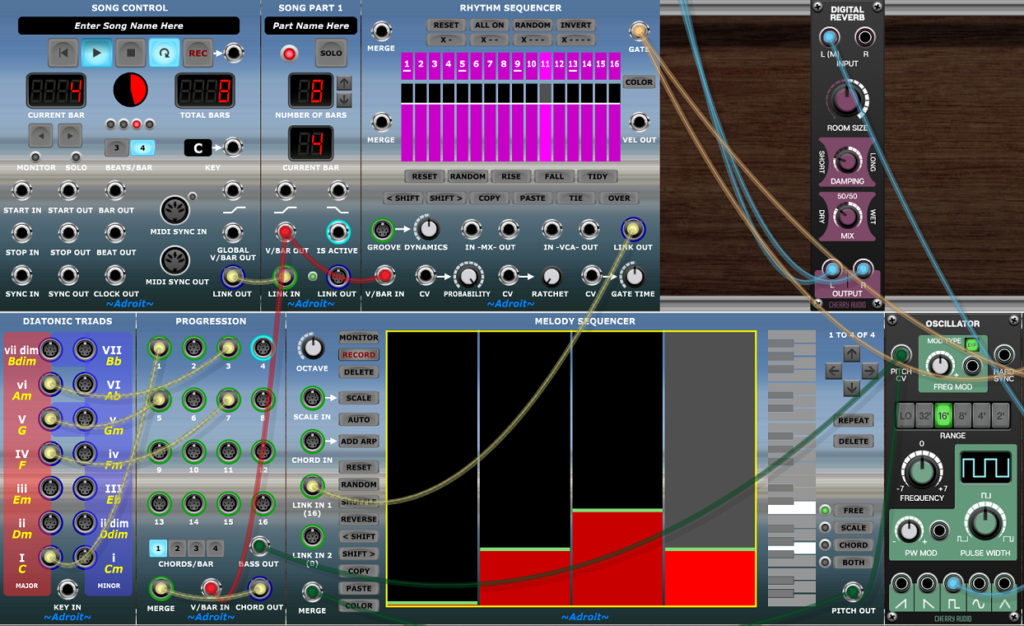
This involves four modules – Song Control, a Song Part module, a Rhythm Sequencer and of course a Melody Sequencer and three cables linking them together.
Ideally you should explore these modules in the following order – Song Control, Song Part, Rhythm Sequencer and then Melody Sequencer.
None of these modules are mind-bogglingly complex but they use novel technology so it’s recommended that you at least glance at the documentation provided on this website to more easily understand how they interact and support each other. Better still check out the LSSP 101 Tutorials and download their accompanying demonstration patches.
Note that Melody Sequencer provides far more sophisticated control over melody that the rather crude technique of using the CV Sequencer that is covered in the LSSP 101 Tutorials.
OK, at the moment we don’t have any sound generation capability, just a basic sequencing mechanism. So let’s add a primitive one oscillator voice.
Note that the envelope generators are being triggered by the GATE output from the Rhythm Sequencer and that the Oscillator’s PITCH CV input is connected to the Melody Sequencer’s PITCH OUT socket…

For your convenience a .voltagepreset file containing this test patch can be downloaded using the button below.
Now to get something happening click on the Song Control’s LOOP button and then its PLAY button. This should create some visual activity including a moving highlight on the Rhythm Sequencer’s display but still no sound.
Next click on the ALL ON button at the top of the Rhythm Sequencer to set the gates on for all 16 steps. This should produce a boring repeating note with a constant pitch.
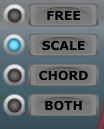
Next click on the SCALE button on the left-hand side of the Rhythm Sequencer.
The Melody Sequencer should then look like this…

And you should hear a rising chromatic scale playing.
Adjust the controls of the modules that are making the sound to taste.
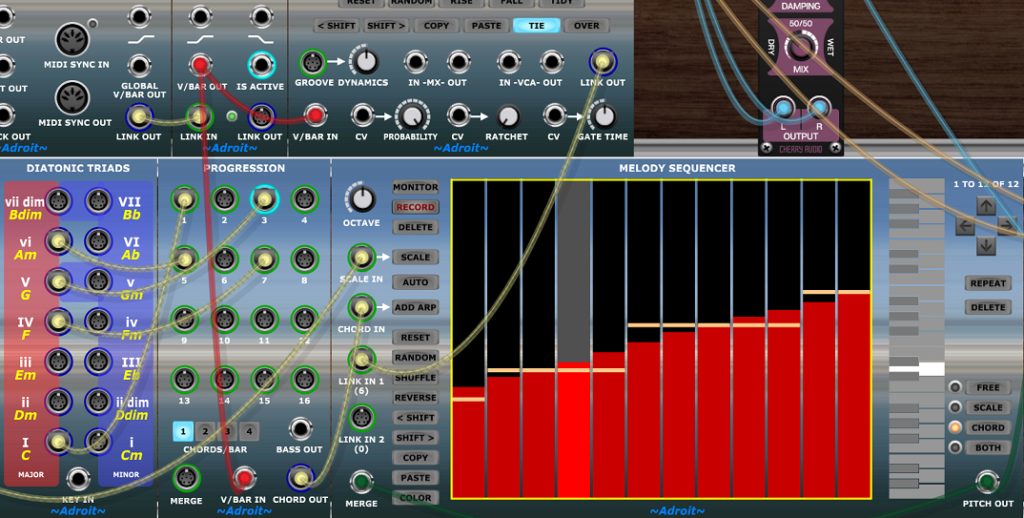
As there are 16 steps to the rhythmic pattern (as indicated by the number 16 beneath the LINK IN 1 socket) while the pitch sequence is 12 notes long (as implied by the text “1 TO 12 OF 12” in the top right corner), the Melody Sequencer plays a pattern consisting of 12 notes of the scale followed by a repetition of the 4 notes at the beginning of the scale.
Click on Melody Sequencer’s AUTO button and you will see the pitch sequence automatically adjust to the number of notes currently programmed into the Rhythm Sequencer.

Note how the yellow selection rectangle now is just on the final step rather than the entire sequence as previously. Melody Sequencer attempts to anticipate the most likely selection required depending on the operation just applied, but it is easy to change the selection with just a click or swipe.
Click on the right-hand DELETE selection button four times to return the sequence to just the 12 notes of the scale. Alternatively press the DELETE or BACKSPACE key four times, or click on the left-hand SCALE button again, or click on Voltage Modular’s undo button or do a CTRL Z on Windows or a ⌘ Z on Mac.
Now click on the X- button of the Rhythm Sequencer. This produces a rhymical pattern with just 8 notes. Notice that the Melody Sequencer adapts to this by just playing the first 8 notes of the scale. Also note that the number in parenthesis below the LINK IN 1 socket has changed to 8.
If you experiment with various Rhythm Sequencer patterns (the RANDOM gate button is useful for this) you’ll gradually understand how the two sequencer patterns interact. The whole idea is to separate rhythm from melody so that they can be independently manipulated. This is based on the notion that you often have a great melody or a great rhythmical idea and being able to independently manipulate them enables you to explore how melody and rhythm interact so that you eventually discover an ideal mesh.
If you are used to a piano roll editor then this might seem very alien at first but it’s an aspect of the LSSP concept of disentanglement and hopefully you will soon see its potential. At first the interactions between the number of steps in the rhythm pattern, the number of steps in the melody sequence and the number of notes in a scale can be really confusing but stick with it and you will eventually have a Eureka moment.
The “mysterious” pitch drop
If you stop the sequence by clicking on the Song Control STOP button (or disengage the LOOP button and allow the sequence to stop automatically) then you’ll hear a mysterious pitch drop. This is not a bug, it’s caused by the PITCH OUT of the Melody Sequencer dropping to zero volts when the sequencer is de-activated. This is discussed later on this page in the section titled End state but for now simply add a cable that connects the PITCH OUT socket to the MERGE socket and you will find that this cures the problem.

Pitch quantization
If needed then click on Melody Sequencer’s SCALE button to revert to the simple 12 note chromatic scale. Also click on the Rhythm Sequencer’s ALL ON button to return to the simple pattern with all 16 steps on (ensure that TIE and OVER are disengaged if you experimented with them).
Also ensure that the entire pitch sequence is selected by swiping with the mouse from the first to the last step of the Melody Sequencer (you should end up with all 12 steps enclosed within a yellow rectangle)
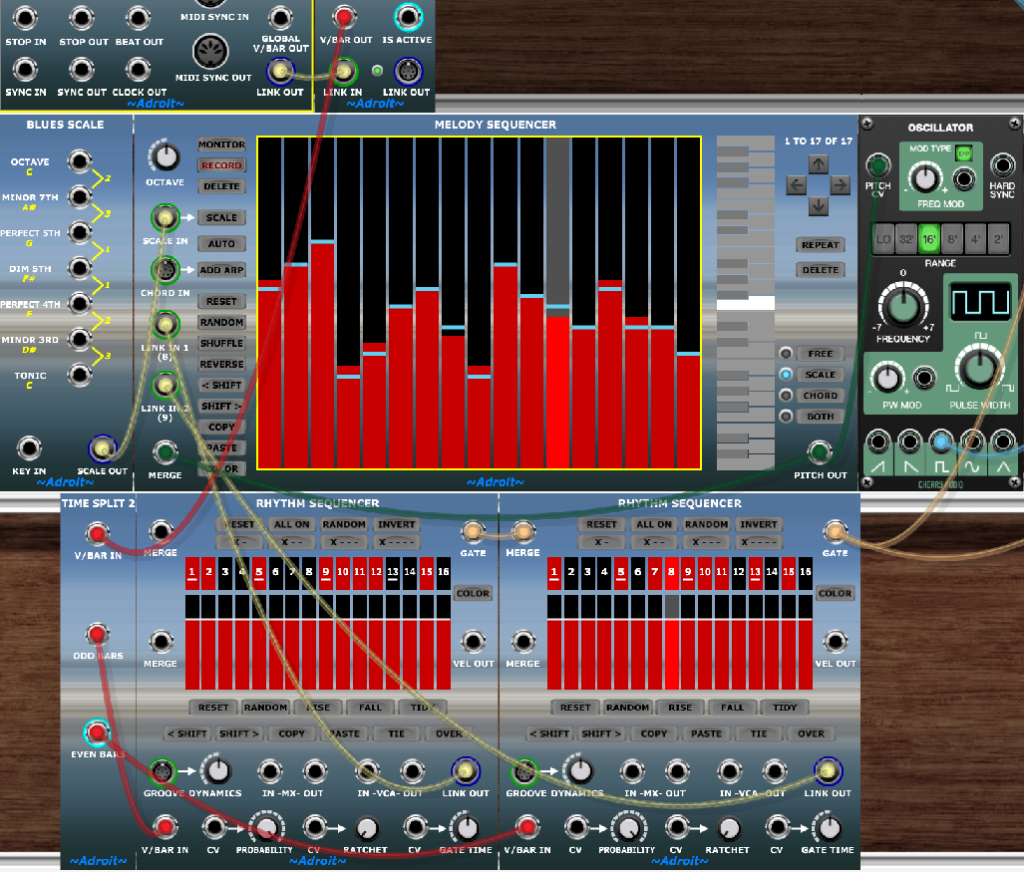
Now add a Blues Scale module to the left of the Melody Sequencer and connect its SCALE OUT socket to the SCALE IN socket of the Melody Sequencer.
At the moment this will have no effect because all of the notes in the pitch sequence have a quantization mode of FREE – indicated by the green bars on each step.

Now click on the right-hand SCALE button…
Every step of Melody Sequencer’s pitch sequence will now be adjusted to fit into the blues scale…
The pitch adjustment is instantly audible (Melody Sequencer checks for quantization, scale and chord changes every sample). The blue lines on the display show that scale quantization is being used and their vertical position shows the actual pitch adjustment being made.
Color coding is used to illustrate the pitch quantization mode for each step.
- Green – Free
- Blue – Scale
- Orange – Chord
- Red – Both Scale and Chord (Chord winning in a conflict where no notes are shared)
To see the effects of chord quantization add a Diatonic Triads module, patch its I socket to the CHORD IN socket of the Melody Sequencer and click on the Melody Sequencer’s right-hand CHORD button…
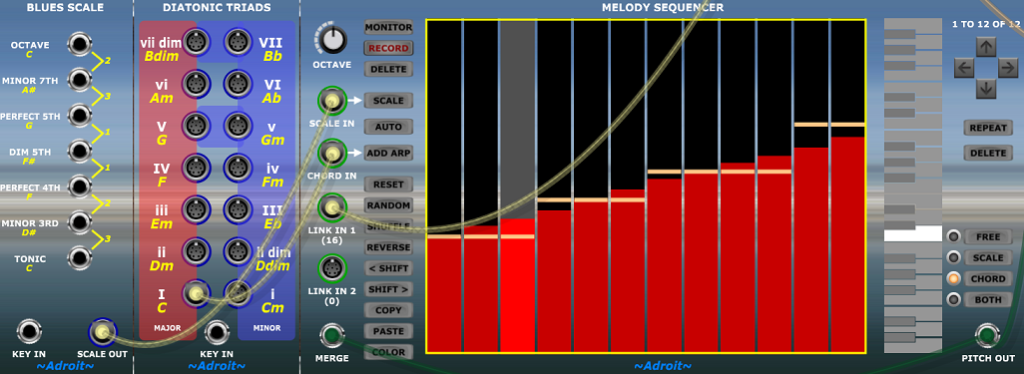
The orange lines on the display indicate that chord quantization is being used for every step of the sequence and their vertical positions illustrate the pitch adjustments being made.
Compositional approaches
For total control you can opt to not use any pitch quantization at all by setting the quantization mode for all notes to FREE. This means you can program exactly the notes you want.
But often you may want to employ quantization for several reasons…
Fitting what you play on a keyboard into a particular scale can be useful if you have limited keyboard skills or if you simply want to experiment with different scales to see how they modify the feel of a particular melodic contour.
Using chord quantization to automatically adjust a melody so that it fits into a chord progression can save you work and also stretch the scope of a simple pitch sequence so that it changes slightly on each repetition depending on the underlying chord progression.
This works nicely when several parallel Melody Sequencers are quantizing different patterns to the same chords as it produces counterpoint automatically.
Note that heavily pitch quantized melodies can sound a bit dull when they are quantized to just diatonic triads but things become more interesting when using the wider palette of chords provided by the Chord module as it can produce intervals such as 2nds, 4ths, 6ths, 7ths and 9ths as well as the roots, 3rds and 5ths that the Diatonic Triads module provides.
When using such extended chords the BOTH quantization mode comes in handy as it allows you to selectively exclude chord tones that don’t belong to the scale.
An important alternative to chord quantization is to simply use transposition. For example patching a cable from the BASS OUT socket of a Progression module to the PITCH CV input of a voice that is already being fed by a Melody Sequencer’s PITCH OUT signal will add the voltages together and therefore transpose the voice’s pitch up and down so that the melody tracks the root note of the current chord.
This can be a very effective way of programming bass which might use Melody Sequencer patterns consisting of little more than Cs and G’s to produce simple but solid bass lines that play roots, fifths and octaves that automatically track chord changes.
In the example above the Progression module’s CHORD OUT signal is not been used but in a practical patch it would typically be used to quantize another voice and/or provide polyphonic accompaniment via one or more Chord Player module.
One technical thing to note here is the feedback cable from the Progression module’s CHORD OUT socket to its MERGE socket. This keeps the final IV chord output signal sustained when the sequence stops. Without this cable both the CHORD OUT and the BASS OUT signal would drop to zero volts. In this patch it would make the transposition drop from F (the root note of the IV chord) to C (the default zero volt pitch).
It’s quite easy to introduce too much dissonance using just transposition. One can control this to an extent by using quantization inside of the Melody Sequencer to quantize pitch before the transposition is done. For example, by plugging the signal from a Chord Module set to 5TH with default key into the CHORD input and using chord quantization, Melody Sequencer will only produce roots and fifths even when the RANDOM button is pressed.
Another option is to apply pitch quantization after transposition by inserting a Pitch Adjuster module just before the the voice’s V/Octave input.
What you will find is that sometimes transposition works well and in other contexts it doesn’t.
Fine control of quantization
So far we have been discussing pitch quantization as an all or nothing affair but Melody Sequencer allows each note in a pitch sequence to be assigned different forms of pitch quantization. So it is for instance possible to create patterns where some notes are quantized to the scale, some to the chord, some to both or for some to be not quantized at all.
This allows melodies to be quantized when needed but also decorated with non-chord or non-scale tones. Such splashes of non-tonal color might just be applied to unaccented transition notes that are generally sparse and short lived but the choice is up to you.
Recording
An important feature of Melody Sequencer is its ability to perform step recording. This allows you to input melodies by playing them at your own pace on a small external MIDI keyboard (such as the ever popular Arturia Keystep).
Providing that the Melody Sequencer and linked Rhythm Sequencer(s) are patched up to create sound then a click on the Melody Sequencer’s MONITOR button will enable you to listen to what you are playing.
When you are ready to record click on the RECORD button and you can then record notes one at a time into the Melody Sequencer up to a maximum of 32 notes. The timing and velocity of the notes played doesn’t matter. All that is being recorded is the sequence of pitches.
Mistakes can be corrected by using the DELETE selection button on the right-side of the module. By default this will delete the last note played but you can use the selection mechanism to delete any notes while remaining in record mode.
Recorded notes are always appended to end of the sequence, they can’t be inserted at arbitrary positions. Although of course once back in normal editing mode then notes can be rearranged, deleted, repeated or changed in pitch as required.
Press RECORD again to end recording. Also starting the Song Control module playing will automatically end recording and drop you out of monitoring mode.
Also engaging the MONITOR button on a Melody Sequencer linked to a different Rhythm Sequencer will cancel monitoring and recording on the current one.
Note that it is also possible to record notes when the MONITOR button is not engaged. This allows you to record silently or while the LSSP system is playing back any existing material (including the notes being recorded).
The pitch range recorded is limited to three octaves beginning at C2 (zero volts in the Voltage Modular system). Notes above or below that range will have their octaves changed to keep them in range.
Use the Melody Sequencer’s OCTAVE knob to change the audible range rather than the octave range facility on the MIDI keyboard.
By default Melody Sequencer does not apply any pitch quantization to the input. However, while monitoring or recording you can click on the SCALE, CHORD or BOTH pitch quantization buttons so that subsequent notes are quantized prior to them being monitored and/or recorded.
Notes can also be recorded using mouse clicks on the Melody Sequencer’s little built-in keyboard graphic but an external MIDI keyboard is highly recommended as it makes programming melodies a breeze. Note that the monitoring function doesn’t work with Melody Sequencer’s little built-in keyboard so you have to have the MONITOR button disengaged to use it to record.
Using two Rhythm Sequencers
Melody Sequencers can be chained to create melodies of any length but often melodic phrases are two bars long so Melody Sequencer is designed to make it relatively easy to use a single Melody Sequencer together with two Rhythm Sequencers to create sequences that span two bars and use up to 32 notes.
This involves chaining two Rhythm Sequencers together in the usual manner (as described in Rhythm Sequencer Operation) and then connecting their respective LINK OUT sockets to the LINK IN 1 and LINK IN 2 sockets as shown below…
Note that the Melody Sequencer is twice the width of a Rhythm Sequencer so they can be stacked into a neat 1 up 2 down (or 2 up 1 down) arrangement and effectively treated as a single double height module that acts as a 32 step sequencer delivering coordinated pitch, gate and velocity CVs.
Chaining Melody Sequencers
In order to support melodies longer than two bars Melody Sequencers (together with their supporting Rhythm Sequencers) can be chained together.
Just like other Adroit sequencers Melody Sequencer outputs pass on whatever signal is present at their MERGE input when they are inactive.
So all that’s required is to patch the PITCH OUT of each Melody Sequencer into the MERGE socket of the next sequencer then take the combined output from the PITCH OUT socket of the final sequencer in the chain.
Also of course the Rhythm Sequencers need to be chained too and have their V/Bar inputs sequenced using time splitting (as described in Rhythm Sequencer Operation).
In a large scale patch Progression modules would be sequenced in parallel and perhaps CV Sequencers too with the entire composition coordinated by a Song Control Sequencer. This is beyond the scope of this page though.
End state
If you are using a Melody Sequencer in a continuously looping patch then everything works fine, but if you want to construct a patch where a Melody Sequencer (or a chain of them) actually stops – for instance at the end of a song, then consideration has to be made for sustaining the end pitch.
As with CV Sequencers and Rhythm Sequencers the solution is pretty simple – just a single cable patching the final output back to the first MERGE socket. But it’s something you need to be aware of, else you might end up with a mysterious pitch drop at the end of the song.
It is simply a consequence of the way V/Bar driven sequencers support chaining. When they are inactive they output whatever is being fed to their input. So the solution is to feedback the final output to the first MERGE socket and it works like a Sample and Hold.
The same problem and solution applies to the Rhythm Sequencer, CV Sequencer, Melody Sequencer and Progression modules. So if at the end of a song you get a mysterious pitch drop or a modulation signal dies prematurely then check to see if you need to add one or more feedback cables. The Note Watcher and CV Watcher modules can be useful for checking in these circumstances to see exactly what’s going on.