Click on the play button below to listen to an mp3 recording of this patch.
Table of Contents
Caveats
This patch uses the Cherry Audio Mini Plug-in Host module to run three embedded copies of Voltage Modular inside Voltage Modular. Unfortunately this creates a platform-independence problem as the plug-in version of Voltage Modular is stored in different file system locations on a PC and on a Mac. So there are two different versions of the .voltagepreset file.
Another issue is that this patch uses four copies of Voltage Modular and a total of 123 modules all running at the same time. If you are using an old machine then you won’t be able to run this patch.
Even if you have a relatively powerful machine this patch can still be quite demanding. Voltage Modular needs to be set up for maximum performance to get it to run smoothly. Having said all that it works absolutely fine on a Ryzen 7 4800H laptop producing a CPU load of around 20%.
Please check out the Performance Tips page for advice on how to optimize Voltage Modular’s settings.
Getting Started
You will need the Core version of Voltage Modular and LSSP 101 to follow this tutorial.
If you are using Windows then click on the button below to download the .voltagepreset file for windows.
If you are using a Mac then click on the button below to download the .voltagepreset file for Macs.
Open the downloaded file to automatically launch Voltage Modular with the ready built patch shown below…

Note that because this patch uses three embedded copies of Voltage Modular it takes about four times longer to load than normal. It also takes longer than normal to shut down.
Click on the Song Control PLAY button in the top left of the patch.

You should now hear a complete song that lasts for over three minutes.
This took just one afternoon to create so it’s not a work of art. It seems best to not craft demonstration songs too much as this would paint an unrealistic picture of what you might be able to achieve in reasonable amounts of time.
The song suffers from a few musical and sonic clichés but these can be educational as you need to be able to see how clichés work in order to push beyond them.
An overview of the patch
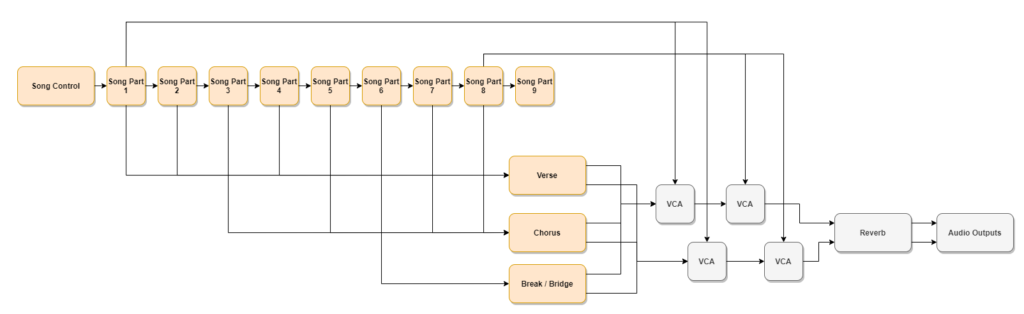
This is the first LSSP patch in these tutorials that actually delivers an entire musical composition rather than an etude. It shows one way to construct a short song with a very common type of structure…
Intro – Verse 1 – Chorus 1 – Verse 2 – Chorus 2 – Break / Bridge – Chorus 3 – Outro
A “tail” is added to provide a gap when listening to the song repeat so in all there are nine parts to the song represented by nine Song Part modules chained together.
The patch also demonstrates a very important technique where individual song parts are compartmentalized into separate “embedded patches”. Although this puts some strain on your computer it removes much of the strain on your brain.
As you can see, this technique greatly simplifies things. Rather than an enormous patch that spans an area way too large to view on one screen, the high-level song structure becomes obvious and easy to manipulate.
The Song Part SOLO buttons are useful here as you can use them to focus on just one section of the song while you work on it. You can also double click on a SOLO button to quickly jump to that part of a song.

In this simple song we have three embedded patches each contained inside a Mini Plug-In Host module. One for the Verses, one for the Choruses and one for the Break / Bridge. A window for each section can be opened and closed as needed.
To open a window for an embedded patch click on the relevant Plug-In Host’s VIEW EDITOR button.

In this instance there’s not a huge difference between each embedded patch. They were constructed by developing the verse and then copying it to the other two parts and making a few modifications. You could probably achieve similar results using the Voltage Modular variation feature, but this technique has much more power as each patch can be totally different if this is required by the composition.
The connection between the top-level patch and an embedded patch is straightforward. A V/Bar signal is sent to the 1L INPUT socket of the Mini Plug-In Host and a stereo audio signal is received back via the 1L and 1R output sockets.
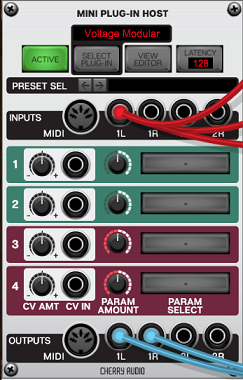
Inside an embedded patch the V/Bar signal is available via the 1L AUDIO SOURCES socket (just because it says “audio” doesn’t mean it’s restricted to audio – you can also use the Plug-In Host’s input and output sockets for control voltages, gates etc as well as audio).
The embedded patch sends audio back via it’s 1L (M) and 1R MAIN OUTS to host sockets.
The Verse patch
The image below shows what is “hidden” inside of the left-hand Mini Plug-In Host module.

As you can see it’s similar in scale to the kind of thing we’ve already looked at in previous tutorials but because it’s hidden from view most of the time the top-level patch is greatly simplified. Only when you need to work on the verse do you need to open a window to look at it.
The image below shows how the AUDIO SOURCES 1L socket is used to distribute V/Bar signals (via the red cables) to various sequencers inside of the embedded patch.
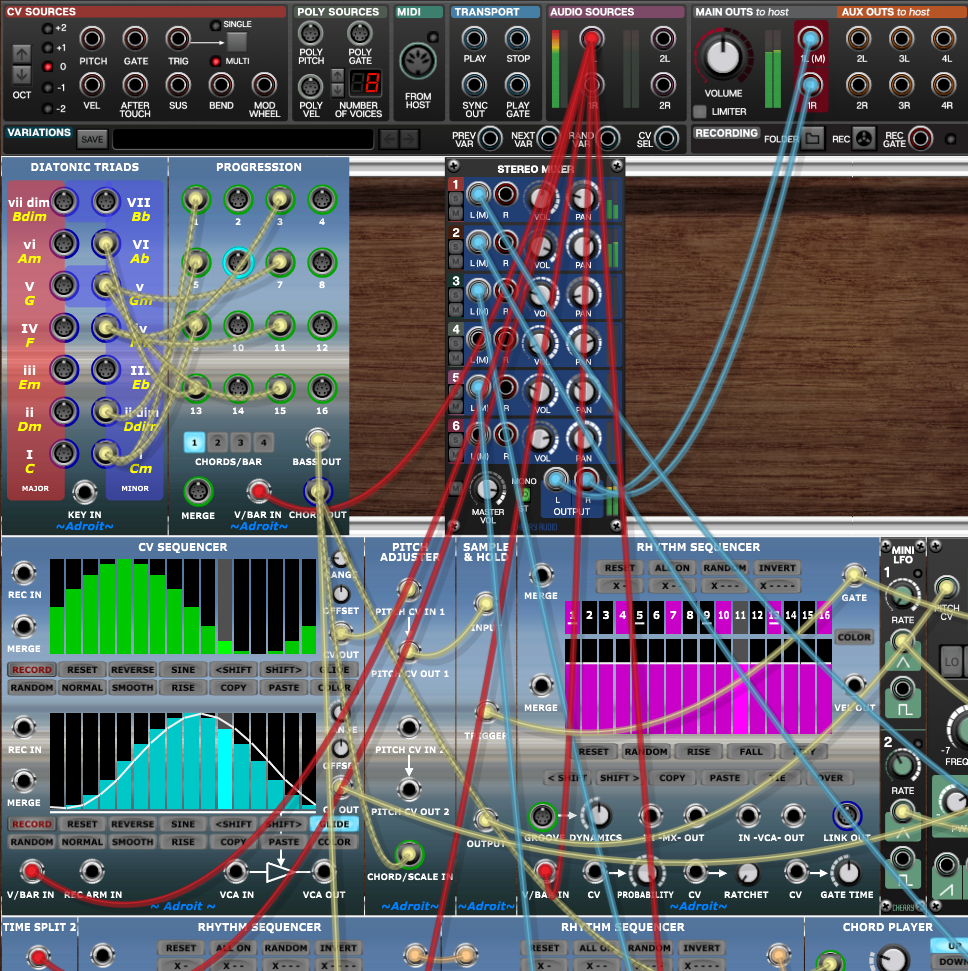
Also note how the stereo audio signals are sent to the top-level patch via the MAIN OUTS to host 1L(M) and 1R sockets.