In this tutorial we’ll look at chaining CV Sequencers together to form sequences longer than 16 steps. We’ll use the patch built in Tutorial 1 as a starting point.
Load up or rebuild the simple patch from Tutorial 1 and press PLAY. You should now have a single bar riff that plays over and over. You can leave it running while we modify the patch to extend the riff to two bars. It’ll glitch now and then as the patch is modified but you can get a better feel for what’s happening by listening to the changes live.
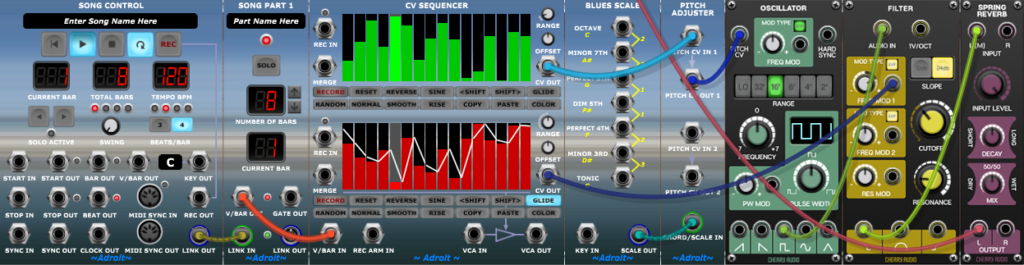
Add a second CV Sequencer module and insert it just to the right of the first, then unplug the cable from the upper CV OUT of the first CV Sequencer and plug it in the upper CV OUT of the newly added CV Sequencer.
Do the same thing with the cable from the lower CV OUT so that the cables feeding the Pitch Adjuster and Filter now come from the newly added second CV Sequencer.
This will obviously break the patch and you will be left with just a droning sound.

Now patch the upper CV OUT of the first CV Sequencer to the upper MERGE socket of the second one.
Then patch the lower CV OUT of the first CV Sequencer to the lower MERGE socket of the second one.

Notice how this fixes the patch and we are back to the initial one bar repeating riff.
What is going on here is that the second sequencer is disabled because there is nothing connected to its V/BAR input and when Adroit sequencers are disabled they pass through any signal from their MERGE inputs directly to their outputs.
See the V/Bar page for more information about how V/Bar sequencing works.
Now what we need to do is split the timing between the two sequencers. In the LSSP architecture this is called Time Splitting.
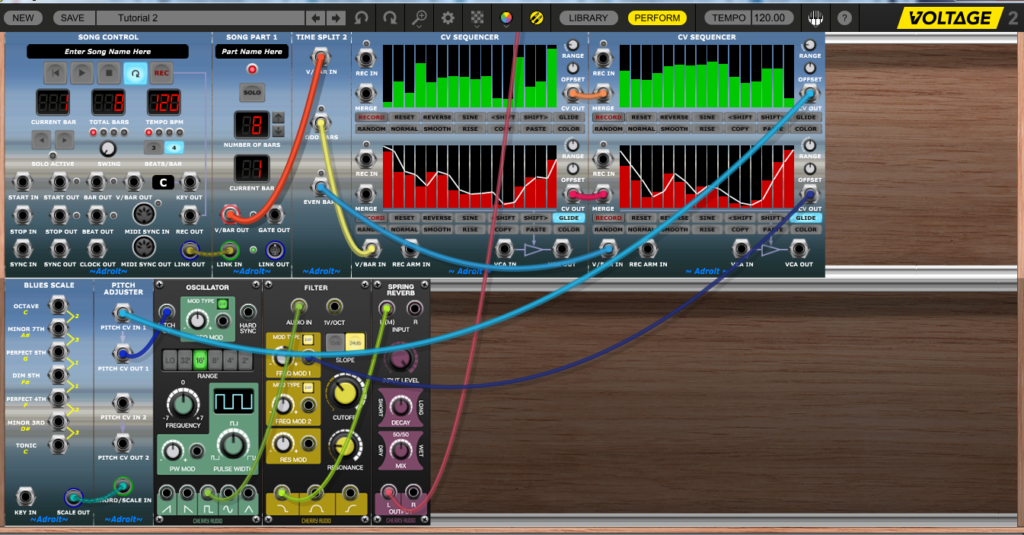
So add a Time Split 2 module, inserting it just to the left of the first CV Sequencer.

Now we need to wire in the V/Bar connections for the Time Splitter.
Unplug the end of the cable from the V/BAR IN socket of the first CV Sequencer and re-route it to the V/BAR IN socket of the TIME SPLIT 2 module. So that the V/BAR OUT socket of the Song Part module is connected to the V/BAR IN socket of the TIME SPLIT 2 module.

This breaks the patch again but if you look closely you will see that the LEDs on the Time Split 2 module are blinking slowly to indicate how the timing is being split. One bar for the LED above the ODD BARS output alternating with one bar for the LED above the EVEN BARS output.
Now patch the ODD BARS socket to the V/BAR IN socket of the first CV Sequencer and the EVEN BARS socket to the V/BAR IN socket of the second CV Sequencer.

We are not finished yet but hopefully you can see where we are heading with this, as now when the highlight moving left to right (indicating the current step) reaches the right hand side of the first sequencer it continues on to the second sequencer.
There isn’t a pattern programmed into the second CV Sequencer yet so there is just a drone sound when it is playing, but there is also another issue. This is because in Tutorial 1 we adjusted the upper RANGE knob of the sequencer to reduce the pitch range to less than 2 octaves, while the new CV Sequencer’s knob is still at its default setting. So the second sequencer currently has a 5 octave range.
When chaining CV Sequencers together you need to ensure that their RANGE and OFFSET knobs match up otherwise you will get unexpected results.

So change the second CV Sequencer’s RANGE knob to match the first. In Tutorial 1 we didn’t set a specific value for the RANGE, (just something under 2 Octaves) but here the values have to match, so check the value of the knob on the first CV Sequencer…

It happens to be 1.98 on my setup, but use whatever value you have and adjust the upper RANGE knob on the second CV Sequencer to match. The easiest way to do this accurately is to right click and use the knob’s Edit Value menu option…

And type in the value.

Notice that the pitch when the second sequencer is active is now a lot lower.
Now test things out by hitting the RANDOM buttons on the second CV Sequencer. You might want to engage the GLIDE button and use the COLOR button to set the second sequencer’s lower channel up like the first too.

You now have a 32 step sequencer!
Before we finish this tutorial let’s tidy up a few loose ends. You’ll notice in the image above that the filter cutoff sequencing in the second CV Sequencer (the bottom right part in red with a white line) is a lot more jagged than the modulation in the first sequencer.
This is because in Tutorial 1 we used the lower channel’s SMOOTH button to modify the filter cutoff sequencing to make it a bit more like the effect one would get physically turning a knob.
So click on the lower SMOOTH button of the second CV Sequencer once or twice to apply some smoothing.

It doesn’t have a dramatic effect but we are trying to tidy things up.
One small point here is that when changing step values with CV Sequencers that are chained together and when GLIDE is engaged you may sometimes see some peculiar behaviour with the white line for the first step changing position. This isn’t a bug. It looks odd but it’s down to how the glide function works to interpolate between the last step of one sequence and the first step of the next. I’ll try and explain this in more detail later.
Next, as we are essentially just messing about at this stage and using random data to program the sequences, I’ve ended up with the second bar’s pitches being a bit wild. You’ll have different results working through these tutorials yourself but will probably have something similarly crazy sounding going on.
CV Sequencer is a general purpose control voltage sequencer and isn’t really intended for sequencing melody but we are just beginning to explore LSSP and it’s reasonable to focus on CV Sequencer for the moment. Besides, it is flexible enough to do a reasonable job with a little patience and tweaking.
So I’ll just apply a quick combination of manual editing and a little smoothing to the second bar’s pitches to make it sound a bit more musical.

The Pitch Adjuster’s quantizing further simplifies the raw voltages shown in this graphic and the result is a much calmer series of notes that provides a nice contrast to the business of the first bar.
Next up, patch aspect ratios (that’s the ratio of width to height)…
This is a very small scale patch but you’ll have noticed that it’s quite wide but only one module high.
Before we wrap up this tutorial let’s address this and look at how to make it easier to see what’s going on by rearrange the modules into something narrower and taller. This involves moving some modules into a lower “cabinet”.
Modules can be moved with the mouse by dragging their top section where the module’s name is. You can do this one module at a time but it’s handy to know that you can select multiple modules at once and drag the whole lot to a new position in one go.
Reduce the zoom to 60% and use a lasso motion to select all the modules from Blues Scale to the right edge and drag them all beneath the remaining modules.
Reset the zoom to 100% (maybe 90% if you have a low screen resolution). Everything should now fit on even a small screen nicely, without you having to scroll to see what’s going on.
Managing large patches can be a challenge but keeping the aspect ratio sensible helps. Although in larger patches we will still end up having very tall patches as it’s often easier to scroll up and down rather than scroll in two dimensions to try and find something.
Remember you can always zoom out to get an overview and then zoom in to actually perform edits.
Save your work as a preset called Tutorial 2 for future reference.
That’s Tutorial 2 done. There’s a long way to go yet but I hope the above all makes sense and you are feeling increasingly confident about mastering LSSP.